EVE-NG (Emulated Virtual Environment – Next Generation) is a powerful network emulator that supports multiple vendors including Cisco and Juniper. This guide provides step-by-step instructions on How to Install Cisco and Juniper Images in EVE-NG installing Cisco IOSv, IOSvL2, and Juniper vSRX/vMX images into EVE-NG.
Pre-requisites
EVE-NG Installed (Community or Pro Edition) – Either on a VM or bare metal.
SSH/CLI Access – Use tools like PuTTY or terminal emulator.
WinSCP/FileZilla – For transferring images to EVE-NG.
Images – Legally obtained Cisco and Juniper image files:
Cisco:
.qcow2format (IOSv, IOSvL2, ASAv, CSR1000v)Juniper:
.qcow2(vSRX),.vmdk(vMX, older releases)
License/Entitlement – For proprietary software (especially Juniper vMX).
1. Installing Cisco IOSv and IOSvL2 Images
Step 1: Prepare the Image
Ensure the image is in
qcow2format:iosv.qcow2iosvl2.qcow2
Rename the image as per EVE-NG naming convention:
hda.qcow2
Step 2: Create EVE-NG Directory Structure
Note: Replace
15.6with the correct version if needed.
Step 3: Upload Image
Using WinSCP or FileZilla:
Upload
hda.qcow2into:/opt/unetlab/addons/qemu/iosv-15.6//opt/unetlab/addons/qemu/iosvl2-15.6/
Step 4: Set Permissions
Step 5: Verify in Web UI
Log in to EVE-NG web UI.
Create a new lab and add a node.
You should now see Cisco IOSv and IOSvL2 in the node list.
2. Installing Juniper vSRX
Step 1: Prepare the vSRX Image
Ensure the image is in qcow2 format (e.g., media-vsrx3-x86-64-20.4R1.12.qcow2) and rename it:
Step 2: Create Directory
Step 3: Upload Image
Using WinSCP, upload hda.qcow2 into /opt/unetlab/addons/qemu/vsrx3-20.4R1.12/.
Step 4: Set Permissions
Step 5: Configure in EVE-NG UI
Create a new lab.
Add a new node → Select Juniper vSRX3.
You may need to configure initial interfaces or console port parameters.
3. Installing Juniper vMX (Optional Advanced)
JHow to Install Cisco and Juniper Images in EVE-NG. Juniper vMX setup can be more complex due to vCP/vFPC architecture.
Basic vMX Components:
vcp.qcow2orvcp.vmdkvfpc.qcow2orvfpc.vmdk
Step-by-Step:
Create a directory:
Upload
vcp.qcow2andvfpc.qcow2into this directory.Rename:
Fix permissions:
In the EVE-NG node configuration, define the number of interfaces, console type (usually telnet or VNC), and RAM (minimum 4096 MB for vMX).
Note: vMX might require specific metadata configuration. Refer to Juniper’s documentation for license and activation.
Common Issues & Troubleshooting
| Issue | Solution |
|---|---|
| Node doesn’t start | Check image format and naming, permissions, RAM allocation. |
| Node not visible in Web UI | Incorrect folder name or structure; verify fixpermissions ran. |
| High CPU usage | Enable CPU virtualization (VT-x/AMD-V) in BIOS; use nested virtualization if running in a VM. |
| Interfaces not visible | Some images require manual interface mapping or extra interface configuration in node settings. |
Best Practices
Always match the folder and image naming convention:
folder-name-version/→hda.qcow2.Keep your images organized by vendor and version.
Regularly back up your EVE-NG VM or installation.
Use SSDs and adequate RAM for performance (recommended 32 GB+ for large labs).
References
Cisco VIRL Images (License required)
Author Profile

Latest entries
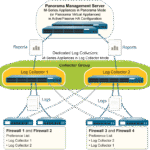 Tips & TricksNovember 7, 2025master_not_discovered_exception in Palo Alto Networks Log Collector
 Tech NewsAugust 17, 2025Malware Analysis For Remcos Remote Access Trojan (RAT)
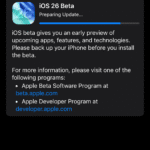 Tech NewsJune 10, 2025How to register and install iOS 26, iPadOS 26, and macOS Tahoe
 Tech NewsJune 1, 2025How to Install Cisco and Juniper Images in EVE-NG


0 Comments